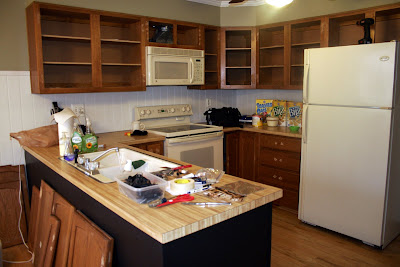
They started their project last July by pulling up their baseboards, but over the past 9 months haven't been able to make as much progress as they would have liked, so we went over to lend some helping hands.
It's been years since Leslie tore an inspiration photo out of a magazine, but she knew what she wanted:

She was completely taken with the white beaded-board wainscoting and checkerboard wood floors, and she wanted to lighten up all of her oak cabinetry. I forgot to take a "real" Before picture before we removed the cabinet doors, but you can see them sitting on the floor in the foreground, hinge holes puttied.

And here is After:

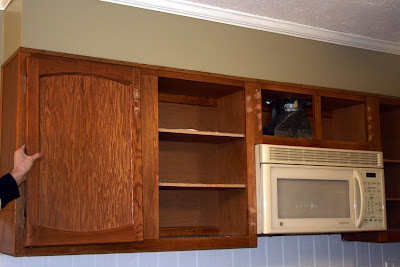
Before with Grayson holding up one of the oak doors:

And After. The upper cabinets are a very pale green, although they look sort of almond-ish in these pictures. I think they're two shades lighter than the walls.

Here's another After close-up -- although not much better -- of the upper cabinetry.

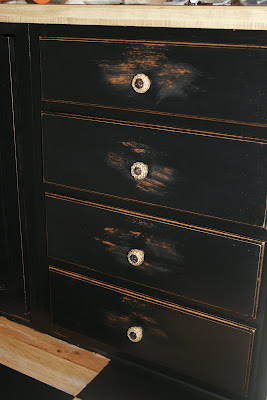
And an After close-up of my personal favorite, the lower cabinetry, which we painted black.

The floors probably cumulatively took longer to do than the cabinets, but John and Grayson did all of the measuring and taping of the floors, freeing me and Leslie up to work on the cabinets. Before:

And After, in daylight and from a little farther away:

Also After, at night with the overhead light on and closer up:

A shot of the floor where the breakfast table sits, Before:

And After, in daylight:

And After, at night with the overhead light on:

The squares didn't all come out PERFECTLY, but since Leslie's going for a distressed look, it will work. And, as John said, "On a gallopin' horse, who'd notice?"
The guys really HAD done a great job of sanding, measuring, marking and taping the floor all afternoon so we could paint it that night after we finished the cabinets. They started off by measuring the 18-inch squares, then marking them with chalk lines parallel to the walls, then taping. They taped the INSIDE of the squares that would remain natural wood and the OUTSIDE of the squares we were painting. Before, during the measuring, marking and taping process:

And After, in the daylight.

Also After, at night with overhead lighting.

John and Leslie have three kids, too, so they'd hired two babysitters, Brittany and Caroline, to corral them for the day. They did such a great job! Here they are making birdfeeders with Nicholas, Isaac and Eliza Claire in the backyard:

Eliza Claire with the remnants of a chocolate chip cookie on her face:

Nick, enjoying the beautiful day and making his birdfeeder:

Isaac loving making his birdfeeder (Nick in the foreground):

Mr. Self-sufficient, Jakey, hanging out on the swings by himself while the other kids made their birdfeeders:

Poor Nathaniel woke up with 103-degree fever on Saturday, so while we worked in the kitchen and the other kids enjoyed the nice day, he watched TV on the couch and was just pitiful. (All well now!)

Late in the afternoon, John and Grayson decided they needed to grab a little shut-eye, but it was after they'd finished most of the floor work. They deserved a break!


All in all, a really successful weekend with lots of progress made on the kitchen! We also painted most of the trim and a section of the hallway to the powder room that needed to be done. Loved the "one-anothering," as John put it. We'll call you when we need the favor returned!

33 comments:
That looks professional! Great job.
Wonderful, great project. I'm contemplating painting my parquet flooring in my den. My husband and I are ripping up carpet from our liv. room today (I actually just posted about this.) so, we've got lots 'o work ahead of us. Thanks for the inspiration!!
wow. what beautiful results. love that you did it with friends. how fun!
I found your blog through the nesting place blog...I had to comment because those floors look awesome! Love 'em!
Wonderful to have friends to share your burdens with.
What a fantastic job! I own a faux finishing company and I've never even tackled squares on a floor. Back breaking I am sure! Love how it turned out. Isn't it great when friends help friends???????
Hi! I came from Nesting Place, where she featured your post today! What a great job! Please please tell me what kind of black paint you used on the floor, and if you polyed it when you were done.
I have a room I would love to do that to!!
Thanks for the inspiration!
ok, that WAS a fantastic job- amazing! and you are really fantastic friends to help them out! i love working on other people's houses too!!
alright- i do have a question... i'm dying to paint my cabinets, which are exactly that honey-ish color, but the sides of the cabinets are that fake-wood- do you know what i mean? and then the doors and fronts are the nice, heavy quality wood. so, with the fake wood part... did they have any of that in their kitchen...and do you think it could be painted and hold up?? if you've got an opinion, after your weekend of painting... let me know :) thanks!
Megan
Katy, Thanks so much for the compliment! It seemed daunting at first, but it was actually easier than it seemed like it would be. The prep work you're talking about doing is MUCH more tedious than the actual work of painting the floor. I guess that's because the demo work is boring, and you don't get to see the "pretty" results right away! Good luck with your project!
Lora Lynn, I really hope you come back to read this reply, because I tried to contact you through your blog one time, and the e-mail was returned undeliverable.
We met at Sophie's house back in the summer/early fall, and I've read your blog from back to front. I'm a big fan!
Thanks for dropping by.
Laurie, Thanks so much for the compliment! I had no idea I was featured on Nesting Place until you told me, because I haven't been able to get on the Internet all day. I'm so excited! And I'm glad so many people enjoyed reading about the floors.
Becky, Thanks for stopping by! It really IS more fun to do projects like that with friends. :)
Magic Brush, I wasn't sure about how the floors would turn out, but they looked great when we got done. We also spread a WAX finish over them to protect them. That way they'll wear more evenly, but hopefully without gouges in the paint.
Meg, I just e-mailed Leslie to ask her to come here and answer your question. I know the paint wasn't something "special," and I think it came from Lowe's or Home Depot. We also put a wax on top, which was a wipe-on type of deal. I'm sure Leslie will come back with an answer soon with all the details. Please check back in! (Sorry to take so long to respond; I was at a scrapbooking crop today and just got back to The Regular World.)
Megan, Yes, the sides of their cabinets were that same type of non-wood that you described. We went ahead and sanded them the same as the cabinet fronts, but we could tell a definite difference when we painted them. It might be a good idea to PRIME those sides also, to help the paint adhere better. I think time will tell whether we'll regret not having primed Leslie's. Leslie will probably answer you, too ... I've asked her to come answer some of the comments from her point of view, so please check back in. Good luck with your project!
WOW!!! That looks really fantastic~~ inspiring!
Sun-kissed, Thanks so much! All of the positive reinforcement has made me eager to try something else fun. :)
"On a gallopin' horse, who'd notice?"...love that! The floors and the entire kitchen is amazing! Great job...you guys are great friends!
Do It Yourselfer, Thanks! It really was a lot of fun. And John is a funny guy. Around 5:00 he asked, "When are we ordering the pizza? On a scale of 1-10, I'm hungry."
Hi, I'm Leslie, the homeowner. I'm so glad everyone likes my floors! It really feels good to see it all done! I've been dreaming about doing this for several years now! Katherine and Grayson were absolutely wonderful to come and help us get it done. We now owe them big time!
We used just a regular latex paint, Dutch Boy, satin finish (from Walmart). I looked at something like 30 black paint swatches before deciding on a color. I had no idea how hard it was to pick out the right color black! I wanted something without any sheen, and so many of the swatches had way too much blue in them. I finally went with the Dutch Boy "Galaxy Depths." We were also trying to be as frugal as possible. I'm sure that Benjamin Moore would have had the perfect color, but I didn't even go there!
The wax finish was chosen because I didn't want a shiny finish as well. Also, in theory, it should allow for the floors to wear with a natural foot path pattern to give me the "been-there-forever" look that I was going for. We'll see. So far, I am pleased with the amount of wear, but I know it will take time to get the right look. Perhaps then, I might need to use a satin finish poly.
We used the exact same paint and wax finish on the cabinets. The wax was recommended to me by a professional cabinet painter that I met at Home Depot. She could have been an impostor, for all I know, but she seemed to know her stuff! The wax finish is called "Howard Feed-N-Wax Wood Preserver." I got it at Home Depot and it has a lovely citrus scent (unlike poly), and you just wipe on, wipe off! So easy! It looks shiny right after you apply it, but it dries nice and matte.
BTW, I do love that John keeps me laughing! Especially through big projects like this that would otherwise have me wound too tight!
So, so, so wonderful! I really would like to do this to my own cabinets. How did you sand them? My cabinets also have recessed areas, and I can't figure how I'd get into the corners....
P.S. I don't have a blog, but I'll check back here for your answer.
Martha, We used a combination of electric sanding and hand sanding. The backs and the flat parts of the front we were able to electric sand. The recessed parts we did by hand, and we did all of the distressing by hand after painting them. I would say that you can't totally get in the corners, but you can get close enough.
I LOVE THIS! The floor is inspiring. Wonder how I could do that to my tile? Thank you so much for linking and I'm glad I found you....or you found me..or something like that!
Have a blessed day,
edie
Edie, I'm not sure how it would work with tile, but it really is a great look on the wood floor. I'm glad you liked it!
What a unique floor design. I love the cabinets as well.
Come by for my GIVE-A-WAY this week by 10 pm Fri.
and then check out our newest addition.
Cheri
www.itssoverycheri.blogspot.com
This turned out great! I LOVE those floors and was just wishing the other day that I had a diamond pattern on my kitchen floor- it's just so visually appealing! Great job!
Looks Great! How brave! And what good friends.
After several months, I have new insight into our floor painting project. The cabinets still look great. THe floors are not holding up as well as I had hoped with just a wax finish. We plan to paint over some of the areas were it has worn too much, then "wear" it the way we want it to look with sanding. Then, we will apply a satin finish poly. Wish me luck!
Oh my stinkin' heck! I love it! That floor is amazing! Thanks for sharing.
Kimba
I love your finished kitchen! Great work!
Coming from ASPTL - YOU are awesome friends!!! It's a wonderful makeover - great job!
My goodness, what a difference! I would have never thought of those beautiful combinations!
Post a Comment